Assignment Description:
When taking pictures of an object in motion, one can either express the motion by blurring the subject, or one can freeze motion. I performed the latter in this photo assignment, trying to capture the water in mid-motion.
Best Photo:
This is the unedited photo, taken outside where my sister would repeatedly drop the ball into the glass for me to take pictures. The pink hue is due to the umbrella she was using.
This is my edited picture, which I obviously cropped and adjusted color and levels.
The original Exposure Triangle:
Shutter Speed: 1/1600
Aperture: 3.2
ISO: 100
Slide Show:
What I Learned:
I learned that stopping motion is really hard. Often times I missed the ball actually hitting the water surface and had to take multiple shots to get a decent picture. I also used curves on gimp for the first time to change the lightness/brightness of the shot.
Assignment Description:
This project was designed for us to explore the different ways we can use gimp to create images. By combining different images together, we were instructed to create a visual representation of common puns.
Photos:
This first image was meant to illustrate the common phrase "bookworm"
Whereas this one is representative of the word "eggplant"
And lastly this one shows "hole milk" in a new way
What I Learned:
I learned how to use multiple layers to create a single image, as well as tweaking the opacity in order for layers underneath the top layer to show through (as used in the hole milk image above).
Assignment Description:
This assignment was supposed to show us how to capture pleasing images without considering the colors of the photograph. By eliminating hues, photographers focus viewer's attention to certain aspects of their picture, enhancing certain elements of the picture.
Photo:
This is the original photo I took of a jar of coins. The lighting was not very good, so I had to eventually adjust the balance in photoshop. The exposure triangle was:
Shutter Speed: 1/8
Aperture: 5.0
ISO: 200
This is the edited photo after using photoshop. I wanted to make some shadows in the picture to contrast the brightness of the rest of the photo.
Slide Show:
What I Learned:
I learned that it is extremely important for one to consider the lighting of the picture when taking a black and white photo. Without different colors to balance an image, you must rely on the exposure triangle to get a decent photo.
Assignment Description:
This project was to introduce us to complex digital editing, for we were instructed to take four words and try to illustrate their dictionary definitions through pictures we found on the internet. We had to incorporate at least three images per word.
Pictures:
What I Learned:
I learned how to alter multiple images to incorporate them together into one picture. I never realized how much work to took to make these photos. I had to use tools like the perspective tool, scaler, blend/blur tool, and the opacity. These techniques were combined with the other skills I've used before, like colorize, levels, and saturation/hue.
Assignment Description:
This assignment was to get young photographers such as myself to begin taking creative, professional pictures of people. We were instructed to fill the frame with our subject, and to somehow portray the person's personality.
Photo:
I forgot to save the original photo, which was taken outside. There had been grass in the bottom third and a parking lot in the remaining background space. I had an exposure triangle of: shutter speed 1/400, aperture 4.0, and ISO 80.
Slide Show:
What I Learned:
I learned previously how to adjust the lighting of the environment to get a proper exposure on my subject's face, as well as placing them in a natural setting to enhance their personality. I barely used photoshop or gimp to enhance the pictures. It was mostly used to adjust the lighting on the girl's face. Although some of these pictures involve multiple people, they truly display the two girls' personalities, which is the most important aspect of a portrait photo.
Assignment Description:
In this assignment we were exploring how to get a professional portrait picture using studio lighting. We set up expensive cameras at many different angles to add light onto our subject. We also tried to make decent photos using a bounce cad; a big piece of white cardboard to reflect light in an attempt to add additional lighting on the subject.
Photo:
What I Learned:
I learned how to manipulate the lighting in an area to get enough to create a nice portrait without expensive lighting tools. I also learned that it is extremely hard to get the lighting to look so professional without that equipment. It is really hard to get good lighting without additional light sources.
Assignment Description:
For this assignment we were instructed to photograph food in a pleasing way that resembled that of professional work. We were told to consider compositional elements as well as exposure settings to create a well thought out picture.
Picture:
This is the original photo. I used an auto exposure setting and only adjusted the shutter speed in order to get the lighting I wanted.
In the edited picture I removed the second strawberry, seeing it as a distraction, and did my best to blend the new black background with the red berry.
Slide Show:
What I Learned:
I learned that food photography is very difficult the master and takes lots of planning and prep-work to finally create a creative picture. It was really hard to get the lighting the way I wanted and was quite difficult to merge the original image with the adjustments I made on Gimp.
Assignment Description:
This assignment was developed to inspire creativity within ourselves as we were instructed to take a picture of the school and digitally add objects to change the context of our photo. By using pictures from the internet and many tools in Gimp we were able to alter the photo in unexpected ways.
Picture:
This was originally a simple shot of the outside of one of the stairwells in our school. I wanted to set the building in a mystical-looking environment by placing it inside a cave thriving with lush rain forest vegetation and ghostly birds.
What I Learned:
I learned how to use layers to create multiple parts of a picture. I also used the scale and perspective tools to change the different elements in an attempt to get a pleasing balance of objects. I messed around with the opacity of different layers to create the allusion of transparency, and used color saturation to make certain hues pop.
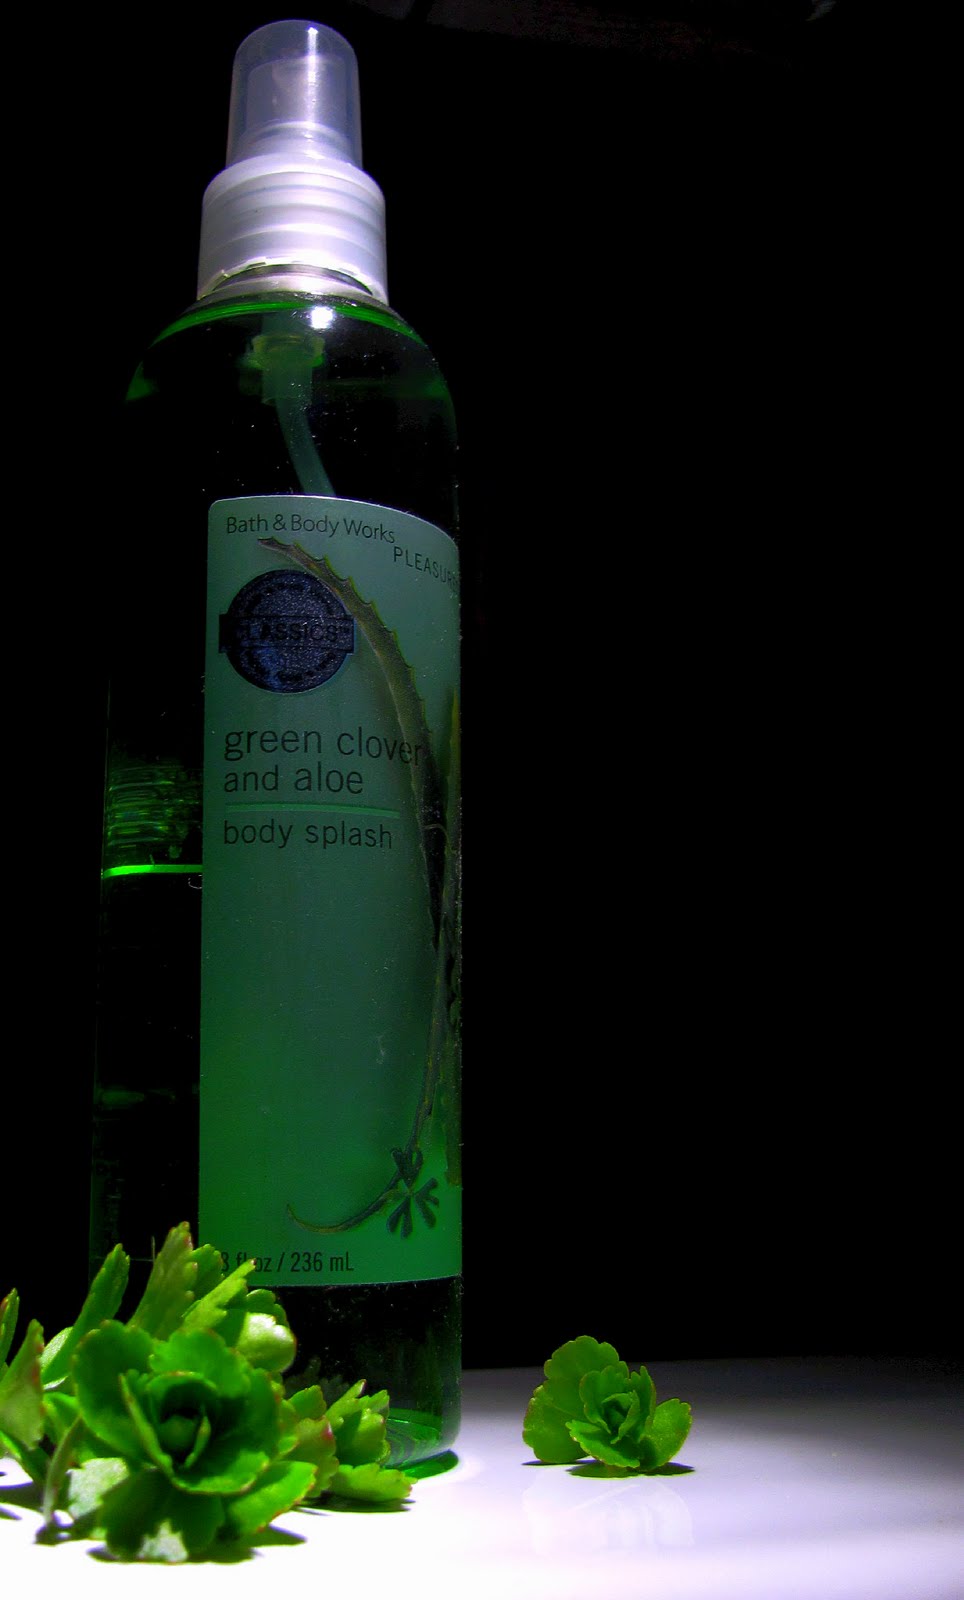
Assignment Description:
This particular type of photography focuses on displaying an item in a pleasing fashion. The goal is to create a picture that could be used as an advertisement in a magazine. It is essential to consider the elements of composition and to create the appropriate exposure to create a good photo.
Best Picture:
This is a picture of a perfume bottle. I placed green foliage around the product to add additional visual interest to the picture and used a flashlight to create a controlled lighting.In manual mode I was able to self-adjust the exposure triangle, with an aperture of 2.8, a shutter speed of 1/15, and an ISO of 100. I needed these settings to ensure a proper exposure in such a low-light situation.
Slide Show:
What I Learned:
I learned how much time it takes for professional photographers to create an advertisement. Each photo I took required multiple adjustments to the lighting, settings, and positions to finally take a good picture. It forced me to learn a little patience.
Assignment Description:
This project was designed to introduce us to a new form of photography. By combining separate pictures with 10-20% overlap, you can create a wide angle view of the environment. We were instructed to take three pictures of the same place, with a 10-20% overlap between photos, then upload them into Gimp where we used multiple layers to seamlessly combine them into one cohesive picture.
Photo:
This is the photo I worked on. I took three pictures of an outdoor courtyard on the school grounds with a slight overlap. (I also used a tripod to ensure minimal differentiation between photos.) Then I uploaded them into the computer, and through gimp altered each to be combined together.
What I Learned:
In this assignment I learned how to create a panoramic view through multiple photos. I learned how to use The shear, scale, and perspective tools that help seamlessly combine these photos. I also learned how to adjust the color levels and sanitation despite the obstacle of multiple layers. I dis howevere have a difficult time getting the overall perspective correct.
Assignment Description:
In this assignment we were told to capture on image that expressed something special about the environment in which we live. We were to tell a story about the outside world through our subject and its surroundings, using the elements of composition to enhance our photos.
Best Photo:
This is a picture of a budding tree in my backyard. I wanted to show the richness of spring through the redness off the buds, and use the darker background to contrast that color. I had the Shutter speed fast, around 1/125, and an aperture at 2.8, for I wanted to counter the lack of light the shutter would let in as well as create a nice depth of field.
Slide Show:
What I Learned: I learned how to see nature in a more artistic way than before. I now look for pictures that display a mood or feeling within viewers, and I pay more attention to compositional elements. Many time I try to off-center a subject, or alter the lighting to get a better photo. I also used gimp to touch up the coloring of the buds to get a little more contrast.
Assignment Description:
This project was an introduction to the various tools available in the Gimp program. We learned how to adjust things like color, sharpness, and text, and were shown new tools like the cloning tool and the select lasso. These allow an artist to adjust raw photos to get a more artistic final result.
Before:
After:
What I Learned:
I learned through this project how to digitally edit photographs using a wide variety of tools. They allow me to insert/remove shadows and highlights, adjust color hues, and transform a normally ok picture into an intriguing one. I learned how to use the cloning tool (which takes a selected area and inserts that color into a different area to remove blemishes) and the lasso ( which selects parts of your photo) to create sleeker looking pictures.
Assignment Description:
This project focused on adjusting the camera for marco settings; a setting that helps photographers take up-close pictures. These are often photos of flowers or insects, objects that are small and don't turn out well under normal zoom settings. It allows the photographer to get within close proximity of the subject, creating a crisper image.
Best Photo:
This is a photograph of a flower following the conclusion of a rainstorm. I wanted to focus in on the water collected within the petals as well as the water droplet in the upper right area. Using my own camera, I had to be in auto mode in order to get this shot, so I don't know the exact aperture, shutter speed, or ISO settings. I do know however that it was marginally sunny, thus the aperture was larger (number) and the shutter speed was a little slower in order to compensate.
Photo Slide Show:
Summary:
Because I had to use my own camera with limited settings, I had a difficult time getting the camera to clearly focus in on the subject. My best photo is admittedly blurry, but clearly displays the water as I wanted it to. I learned that the Macro setting on simple cameras do not produce magazine-quality photos, however they are adequate for everyday use. I also learned how to edit photos within Gimp.
This assignment was to introduce us to digital photograph editing. Within the gimp program, we learned how to adjust the size of the image, alter the coloring, and add special effects to modify the original. We were instructed to perform all these tasks, as well as create a collage of multi-colored images in a representation of Pop Art.
I learned how digitally alter images through gimp. I now know how to crop an image, adjust the coloring, and rearrange the image to a position I want. This will allow me to perform the same tasks on other images, creating "better" photographs using digital programs.
Assignment Description:
In this project we were instructed to explore the numerous elements of composition and capture images that best represented those elements. We also were introduced to photoshop.com and blogger.com, two programs we will be using for the remainder of the trimester.
What I Learned:
I learned the 11 elements of Composition and how they can help photographers take better photographs. They are elements that are pleasing to the eye and add more intrigue to the picture. I also learned how to use photoshop.com as well as blogger.com.


